New Years Eve Party Treat!

Mini Party Quiches a yummy and fun way to ring in the year 2013!!!
Makes: 12 servings
Serving size: 2  quiches
Yield: 24
Prep 30 mins
Bake 425°F 8 mins
Bake 350°F 20 mins
Cool 5 mins

ingredients
Nonstick cooking spray
2 cups all-purpose flour
2 tablespoons grated Parmesan cheese
1/2 teaspoon salt
1/3 cup olive oil or canola oil
5 – 7 tablespoons ice-cold water
1 egg
1/3 cup milk 
Dash ground black pepper
1/3 cup finely shredded Monterey Jack cheese or Gruyere cheese
1 tablespoon chopped green onion
5 – 6 pear or cherry tomatoes, thinly sliced, and/or small herb leaves
Fresh thyme leaves (optional)

directions
1. Preheat oven to 425 degrees F. Coat twenty-four 1-3/4-inch muffin cups with cooking spray; set aside. For pastry, in a large bowl stir together flour, Parmesan cheese, and salt. Add oil all at once. Mix until crumbly. Add 2 tablespoons of the ice-cold water; stir to combine. Add enough remaining water, 1 tablespoon at a time, until flour is moistened. Gather into a ball, then knead gently just until pastry holds together.
2. Divide pastry in 24 portions. Press each portion into a muffin cup. Do not prick pastry in cups. Bake for 8 to 10 minutes, just until pastry begins to brown. Remove from oven; set aside. Reduce oven to 350 degrees F.
3. For quiche filling, in a small bowl whisk together egg, milk, and pepper. Stir in the cheese and onion. Fill each pastry cup with about 1 teaspoon filling. Top each quiche with a tomato slice or herb leaves.
4. Bake quiches for 20 minutes or until filling is puffed and set. Cool in muffin cups on a wire rack for 5 minutes. Remove from cups; serve warm. If desired, sprinkle with fresh thyme.

nutrition facts

Servings Per Recipe 12, cal. (kcal) 156, Fat, total (g) 8, chol. (mg) 20, sat. fat (g) 2, carb. (g) 17, Monosaturated fat (g) 5, Polyunsaturated fat (g) 1, fiber (g) 1, sugar (g) 1, pro. (g) 4, vit. A (RE) 41, vit. A (IU) 146, vit. C (mg) 1, Thiamin (mg) 0, Riboflavin (mg) 0, Niacin (mg) 1, Pyridoxine (Vit. B6) (mg) 0, Folate (µg) 40, Cobalamin (Vit. B12) (µg) 0, sodium (mg) 141, Potassium (mg) 57, calcium (mg) 50, iron (mg) 1, Percent Daily Values are based on a 2,000 calorie diet

Snow Shoveling Safety Tips from our friends at GEICO

from GEICO By Nathan Erb

Here’s The Scoop

Unless your means of transportation is a snowmobile (with snowmobile insurance, of course), those of us in colder climates will have to clear our driveways and sidewalks at some point this winter.

It’s a chore that most of us dread, but it can also result in injury or be life-threatening. Follow these tips to stay safe and become more efficient at snow removal this season.

Step 1: The Physical Challenge

It’s not as cool as bragging about hitting the gym, but shoveling snow can be a great workout. It can also be a deceivingly intense workout, especially if you’re not prepared. Before grabbing the shovel:

If you have a history of heart or back problems, check with your doctor first, just as you would before any strenuous activity.
Stretch. Just as you would before a run or bike ride, you’ll be using your hamstrings, shoulders, back and muscles you didn’t even know you had.
Stay hydrated. The cold weather and physical strain will take its toll, so drink plenty of fluids before, during and after the job.
Step 2: Be Armed With The Right Tools

You should be prepared with the right equipment long before the flakes start to fly. Here’s your shopping list:

Start with the right clothing. This includes waterproof boots with good traction, gloves with a good grip and a hat that covers your ears. Dress in layers and remove extra clothing as you heat up.
The shovel should be lightweight and have a blade that isn’t too large. This will prevent you from lifting too much snow each time. The handle should be long enough to allow for good posture when lifting.
Once an area is mostly clear, use de-icer, sand or cat litter. Have these items on hand before your local hardware store sells out when a storm approaches. Learn more about de-icing your sidewalk.
Step 3: Strategize

A little brainpower can make the process a lot easier. Before you start randomly shoveling areas like a madman, use these tips:

Most areas you shovel are a rectangle. Determine the center point, then move snow to the nearest edge so that you’re going the shortest possible distance.
Clean cars first. If you brush a foot of snow off your roof, there’s only one place for it to go, and you’ll be shoveling the same area twice.
If a significant amount of snow is expected to fall, try to get a head start. It will be easier to shovel in several passes.
The sun is your friend. Any exposed ground will warm up and melt the remaining area much quicker than a thick layer of white.
Step 4: As You Shovel…

Pacing yourself and using the proper technique is the key to preventing injury.

Posture is everything. Keep your back straight and lift with your legs when you can’t push the snow. Keep one hand close to the shovel blade for better leverage, and don’t twist your body.
Take frequent breaks. 15 minutes of shoveling should be followed by 15 minutes of rest.
Team up. Joining neighbors and families will make the effort more enjoyable, quicker and safer.
Following these tips will make the snow removal process less of a headache (or backache), and give you more time to enjoy winter’s beauty.

USA Made for Holiday Gifts

Want to purchase that wicked special person on your list a great travel bag for their bike? Wouldn’t you like to purchase one that is made right here in the USA from Mustang Seats?

If this interests you then you gotta check out,the Mustang Journey Bag will handle an extended trip with ease. The combined storage capacity of the main compartment and three side compartments is 3,744 cubic inches. The internal framework of the bag combined with adjustable backrest pad provides ample lumbar support. Bag can be mounted on the rear passenger seat or the sissy bar with a luggage rack. The Journey Bag comes with a free rain cover for added protection. Measures 18” tall x 14” deep x 20” wide. Also available with studs Rain cover included. check ’em out at mustang.com

Homemade Holiday Gifts are the BEST!!

This Holiday Season we at Garage-Girls want to support Small Business and homemade gifts vs. large franchise bought gifts. Check out this great easy to make recipe that leaves you with tons of options of packaging up as a cute gift!

Chocolate Slab
Makes: 60 servings
Prep 20 mins
Stand 1 hr
ingredients
1Tempered Chocolate, recipe below or 1 1/2 lb. chocolate-flavored candy coating, melted Assorted miniature chocolate candy bars or candies
Assorted decorative candies, crushed peppermint candy, and/or broken pretzels

directions
1. Line an 11x7x1 1/2-inch baking pan with parchment paper*, allowing edges to extend beyond the edges of the pan.
2. Wipe off any water from bottom of bowl with chocolate mixture, see Tempered Chocolate, receipe below). Pour about 1/2 of the Tempered Chocolate into pan; spread chocolate to edges of pan. Arrange chocolate candy in pan, leaving a 1-inch border. Evenly spoon on remaining chocolate, spreading to cover candies. Top with additional assorted candies or crushed peppermint. Let stand at room temperature until firm (about 1 hour).
3. Lift candy from pan with parchment. Cut or break into pieces.

*Test Kitchen Tip:
4. To line pan with parchment, invert pan. Lay a piece of parchment paper over the bottom of the pan (make sure that the piece is large enough that the edges will extend beyond the edges of the pan). Make creases at pan edges. Remove paper and make folds along the creases. Invert pan right side up. Place paper in pan.

Tempered Chocolate:
5. Chop 1 1/2 pounds semisweet, bittersweet, dark, or milk chocolate. Place in a 2-quart bowl with 1/4 cup shortening; stir to coat chocolate with shortening. Pour very warm tap water (110 degrees F) in a very large bowl to a depth of 1 inch. Place the bowl with chocolate inside the bowl of warm water (water should cover bottom half of bowl of chocolate). Adjust water level as necessary (be careful not splash any water into the chocolate). Stir the chocolate mixture constantly with a rubber spatula until completely melted and smooth (this should take 20 to 25 minutes). When the water cools, remove the bowl containing the chocolate. Discard the cool water and add warm water and continue as above until all the chocolate is melted.

Why Temper Chocolate:
6. Tempering chocolate ensures that the cocoa butter in the chocolate melts slowly. If melted too quickly or at too high of a temperature, the chocolate will “bloom” (have white streaks running through it) when it sets up. Tempered chocolate keeps its shiny appearance and smooth texture after it cools and sets up.

from the test kitchen
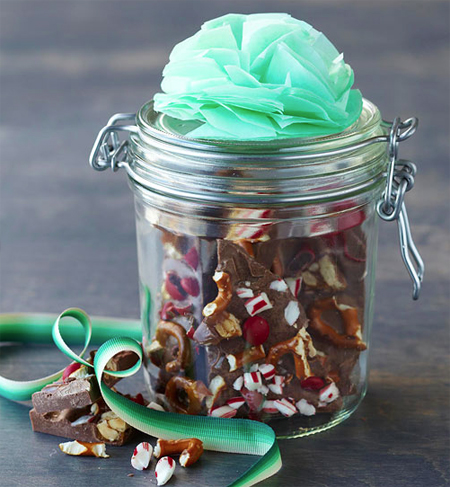
Our team chose to make two variations: For the milk chocolate variation we used crushed candy canes, broken pretzels, red candy coated milk chocolate pieces and chocolate-coated caramel-topped nougat bars with peanuts. For the dark chocolate variation we used candy coated chocolate pieces, brown jimmies, red nonpareils and raspberry filled chocolate squares.


Garage-Girls Winter Care Car

It’s that time of year again, (ugh) where the weather can be stacked against you and your car, here are some tips from CTEK on winter car care. Stay ahead of the game and hopefully prevent a disaster to deal with in lousy weather on the side of the road.

Tires
The tread and pressure of your tires is the most important check you can undertake at any time of the year, but we rely on our tires even more when the road surface is slippery. Pressures can decrease in cold weather, so you should inspect them regularly and ensure you fill them to the correct levels. Contact your local tyre workshop and ask if you are unsure about how to do this properly. In the UK, a tyre’s tread depth must be at least 1.6 millimetres across the whole central section, but most manufacturers advise 3 mm.
Batteries
It’s not just people who get caught out by wintery conditions, vehicle batteries do too because low temperatures put additional strain on power sources. Visually inspect your battery it and wipe any dirt away from the contact terminals, check the charge state and, only if required, charge it to maximum capacity. Make sure the battery is holding its charge by testing again a week later or use a smart charger, such as the CTEK MXS 5.0 12V battery charger, which features a diagnostic function that displays whether a battery can receive and retain a charge.
Radiators
In the event of a truly cold snap, radiators and even engine blocks will crack as the engine coolant freezes. To avoid an expensive repair, keep your radiator topped up with a 50/50 mix of water and anti-freeze. If you’re worried about the percentage of anti-freeze currently in the system, buy a testing kit or ask your mechanic to check for you. Alternatively, flush the radiator out, especially if it’s not been cleaned in a while.
Windscreens
Top up your window washer reservoir with a mix of screen wash, which, again, prevents the liquid freezing solid and potentially causing damage. Also, inspect your windscreen wipers and test their efficacy using a watering can to replicate heavy rain. It’s likely you will be using your wipers much more over the next few months. With the extra grime and grit that ends up on roads during times of snowfall you should keep your blades in top shape so you can always see clearly and drive safely.
For more information about CTEK’s range of vehicle battery maintenance, testing and charging products, visit www.ctek.com.